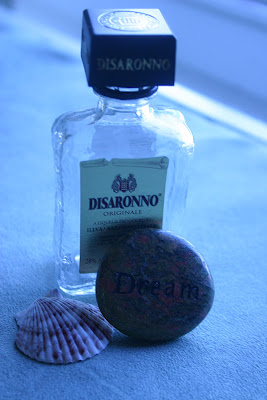
Straight out of the camera. Yuck! I use a very old Canon Digital Rebel. Admittedly, even though I've had it for years, I am really just learning about this camera. Everything is coming out of my camera blue. I know this means the white balance is off, even though I have it set on "auto white balance". What I don't know is how to fix it. This issue has me stumped. Can any of you photography pros out there help me???

Basic PSE post-processing which I learned how to do from a JessicaSprague.com online course. Thank goodness that I have learned how to do this as there are so many photos that I would simply delete if I had to deal with what I captured SOOC. I first remove the color cast, then play with the lighting, adjusting shadows, highlights, midtones, brightness and contrast until I think the picture is more true-to-life. Even if it is still as boring as a box of rocks. In this photo, I used the colors in the rock and shell as my guides. The bench cover is actually a beautiful sage green, but it never photographs true to color, no matter what I do!
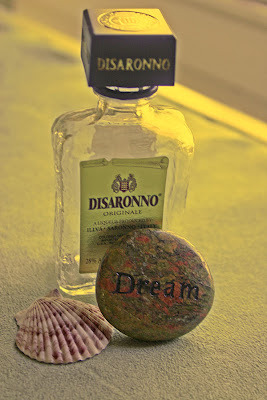
Now I've added the Pioneer Woman "Warmer" action. I have been adding this one to a lot of my photos lately. It really makes it feel nice & cozy and ups the sunshine factor! It also took the rock & shell much closer to actual color than I could get playing with the PSE settings that I know how to use.
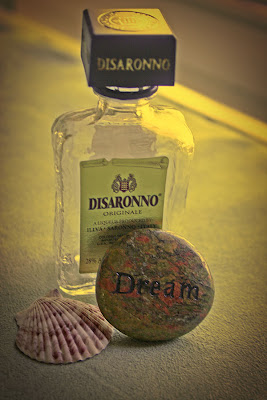
For my final adjustment, I added the Pioneer Woman "Edge Burn" Action (same as vignette). But I dropped the opacity down to 50%. At full strength it is just too harsh for this picture. I use the edge burn sparingly. On some photos it really adds to the mood nicely, on others it just blocks detail and is distracting. So there you have it... from out of the camera icy blue and boring to a warm moody finish! Now if I could just learn how to get better results straight from the camera!

 Straight out of the camera. Yuck! I use a very old Canon Digital Rebel. Admittedly, even though I've had it for years, I am really just learning about this camera. Everything is coming out of my camera blue. I know this means the white balance is off, even though I have it set on "auto white balance". What I don't know is how to fix it. This issue has me stumped. Can any of you photography pros out there help me???
  Basic PSE post-processing which I learned how to do from a JessicaSprague.com online course. Thank goodness that I have learned how to do this as there are so many photos that I would simply delete if I had to deal with what I captured SOOC. I first remove the color cast, then play with the lighting, adjusting shadows, highlights, midtones, brightness and contrast until I think the picture is more true-to-life. Even if it is still as boring as a box of rocks. In this photo, I used the colors in the rock and shell as my guides. The bench cover is actually a beautiful sage green, but it never photographs true to color, no matter what I do!
 Now I've added the Pioneer Woman "Warmer" action. I have been adding this one to a lot of my photos lately. It really makes it feel nice & cozy and ups the sunshine factor! It also took the rock & shell much closer to actual color than I could get playing with the PSE settings that I know how to use.
 For my final adjustment, I added the Pioneer Woman "Edge Burn" Action (same as vignette). But I dropped the opacity down to 50%. At full strength it is just too harsh for this picture. I use the edge burn sparingly. On some photos it really adds to the mood nicely, on others it just blocks detail and is distracting. So there you have it... from out of the camera icy blue and boring to a warm moody finish! Now if I could just learn how to get better results straight from the camera!
6 comments:
Cheri, the last shot is really fabulous!
On my camera, I have the option to custom set the white balance. In the manual it runs through the procedure - it involves holding up a sheet of paper and taking a photo of that - not too difficult but perhpas it would help? Maybe don't use auto? I try to change mine to indoors, sunny, cloudy etc. Other than that, I have no clue - far too technical for me ;-)
PS - great minds think alike today! lol :-)
I know nothing about editing pictures at all, and precious little about taking good ones BUT I can say that learning to custom set my white balance every single time I take a set of pictures really does seem to have improved the look of my photos. Definitely worth a try.
Well, I'm very impressed! That first shot is really not great due to the blueness, but you've turned it into something so special xx
I use a Canon Rebel too. I have a button for white balance on the camera; you must have one too. Automatic white balance isn't terribly reliable as your first photo shows. Once you find the button, you'll see different icons for different kinds of light. I use daylight, cloudy, tungston (regular light bulbs) and florescent. Changing it makes a huge difference.
You did a great job of correcting it in PSE. The automatic color correction under enhance does a pretty decent job really quickly, too. I like the last one with the vignette the best. Those are perfect objects for that kind of photo.
Wow! What a striking difference between the straight out of camera shot and your end result.
I've always been too intimidated to play with photo editing. That's something I'd like to learn one day. You've done a beautiful job!
I leave my camera on auto wb because it's the easiest to fix post processing and it's one less thing for me to have to adjust. I'd rather worry about aperture, shutter speed and iso. Those things are easy to fix in post processing like WB. Once you learn color casts you're good to go. I use photoshop but am thinking of buying lightroom.
Post a Comment